User Guide#
Workflow#
The connector imports the requirements from the needs file produced by the build process. Refer to needs_build_json for details.
The connector exports the SCADE needs to a file (JSON) that can be imported with the directive needimport.
It provides the following built-in fields:
id: OID of the needtitle: name of the needtype: downstream type specified in the settings
It also provides the following extra options that must be declared
in the build configuration (conf.py):
image: path of the image file otherwise<null>scade_type: kind of the need:EquationSet,State,Record, etc.scade_path: path of the need.scade_url: URL to locate the need in the SCADE IDE.scade_icon: icon associated to the need.
These options can be used in custom layouts or templates.
Configuration#
The connector requires a minimal build configuration customization, to declare the types and extra options.
Example of sphinx-needs configuration (conf.py):
...

# sphinx-needs configuration
needs_types = [
    # high level requirement
    {
        'directive': 'hlr',
        'title': 'REQ',
        'prefix': '',
    },
    # low level requirement
    {
        'directive': 'llr',
        'title': 'SC',
        'prefix': '',
    },
]

# traceability link produced by the connector
needs_extra_links = [
    {
        'option': 'covers',
        'incoming': 'is covered by',
        'outgoing': 'covers',
    },
]

needs_extra_options = [
    # mandatory connector options
    'scade_path',
    'scade_type',
    'scade_url',
    'scade_icon',
    # when export graphics is selected: image of the element
    'image',
    # field 'Nature' of the DesignElement annotation
    'Nature',
]

# define a custom layout to
# * add the icon
# * hide the id
needs_layouts = {
    'scade-suite': {
        'grid': 'simple',
        'layout': {
            'head': [
                '<<meta("type_name")>>: <<image("{{scade_icon}}")>> '
                '**<<meta("title")>>**>> '
                '<<collapse_button("meta", collapsed="icon:arrow-down-circle", visible="icon:arrow-right-circle", initial=True)>>'
            ],
            'meta': [
                '<<meta_all(exclude=["scade_icon", "image", "layout"], no_links=True)>>',
                'covers: <<meta_links("covers", incoming=False)>>',
            ],
        },
    }
}

# override the default regular expression for SCADE Suite OIDs
needs_id_regex = r'^[A-Za-z0-9_!/]{5,}'

# export the needs to a json file, to be imported by the connector
needs_build_json = True

# reduce the size of the file
needs_json_remove_defaults = True

...
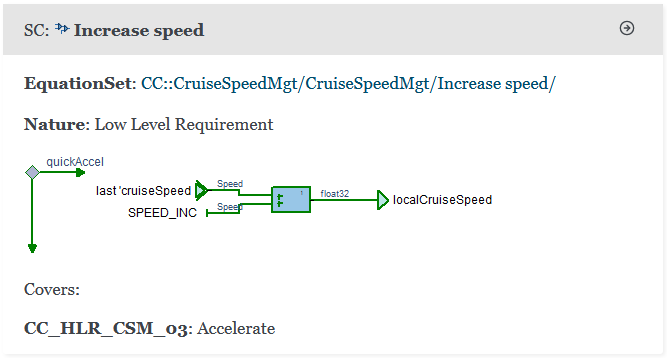
Example of template (llr.need):
**{{scade_type}}**: `{{scade_path}} <{{scade_url}}>`_

**Nature**: {{Nature}}

{% if image != "<null>" %}
.. image:: {{image}}
:alt: {{title}}
{%- endif %}

Covers:
{% for link in covers %}
{# :need:`{{link}} <{{link}}>`: :ndf:`copy('title', '{{link}}')` #}
| **{{link}}**: :ndf:`copy('title', '{{link}}')`
{%- endfor %}
You can import the SCADE needs using the custom scade-suite layout
and llr template to render needs as follows:
.. needimport:: /_scade/model.json
    :layout: scade-suite
    :template: llr
Declaration#
Use the command Project/ALM Gateway/Settings... once
to select the connector ALMGW Connector for sphinx-needs.
Once the connector is selected, this command does not operate anymore. Refer to the next section for details on settings management.
Note
If the project is already connected to an ALM tool, you have first to delete this connection by deleting the ALM Gateway project file (ALMGP) in the project’s directory.
Settings#
Using the Graphical User Interface#
This mode applies only to projects that can be loaded with SCADE Studio. SCADE Display projects must be setup using the command-line interface, as explained in the next section.
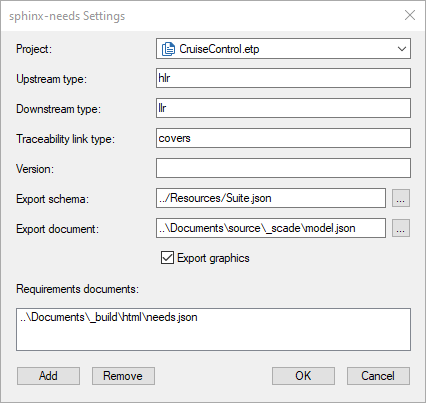
Use the new command Project/ALM Gateway/sphinx-needs Settings... to:
Select the requirements documents for each loaded project.
Select the type names for needs and links.
Specify an optional LLR export schema to produce the SCADE needs file.
Note
Refer to Traceable Elements Export Schema for details.
Specify the path of the SCADE needs file to export.
Using the Command-Line Interface#
The Python command-line tool setup_ansys_scade_almgw_sphinx_needs.exe allows to setup
the project. It is located in the Scripts folder of the Python installation directory.
usage: setup_ansys_scade_almgw_sphinx_needs [-h] [-p <project>] [-u <upstream>]
                                            [-d <downstream>] [-l <link>] [-v <version>]
                                            [-s <schema>] [-o <output>] [-i [<inputs> ...]]
                                            [-g]

options:
  -h, --help            show this help message and exit
  -p <project>, --project <project>
                        Ansys SCADE project (ETP)
  -u <upstream>, --upstream <upstream>
                        upstream type
  -d <downstream>, --downstream <downstream>
                        downstream type
  -l <link>, --link <link>
                        link type
  -v <version>, --version <version>
                        version of requirements
  -s <schema>, --schema <schema>
                        json export schema
  -o <output>, --output <output>
                        export document
  -i [<inputs> ...], --inputs [<inputs> ...]
                        requirements documents
  -g, --graphics        export diagrams
For example:
setup_ansys_scade_almgw_sphinx_needs -p MyProject.etp -u ../docs/_build/html/needs.json
Files#
Ansys SCADE ALM Gateway connector for sphinx-needs produces several files in the project’s directory.
The <project.sphinx-needs.trace> file stores the traceability links
and must be added to the configuration management system.
The other files are present for logging or debug purpose only:
<project.sphinx-needs.llrs>: Temporary file for exporting the SCADE needs.<project.sphinx-needs.reqs>: Copy of exchange file for importing the traceability.<links.json>: Copy of exchange file for exporting the traceability.
Limitations#
The connector does not export diagrams and equation sets.